Tutorial 10: Interacting with the Celebs - Creating Navigation Behaviors
In this tutorial, we will be using various media and techniques described
in previous tutorials, including celebs.dir,
hey.wav, gday.wav
and morning.wav.
Right click on the hyperlinks to save the files.
1. Open celebs.dir
and import hey.wav,
gday.wav and morning.wav.
2. Change the stating point for sprites 1 to 3 to frame
1.
3. In the Property Inspector, change the Stage size to
640 x 480. You will notice that Stage area appears to have
been added below the sprites. Sprite location is referenced from the top
right corner (which is 0,0). So by increasing the Stage size, sprites are
still referenced to the top left corner and appear to move up on the Stage.
 4.
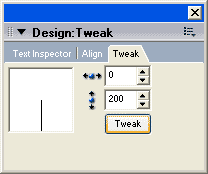
Select all the sprites and choose Modify > Tweak.
5. Change the vertical field to 200 and
press the Tweak button
The Tweak tool is useful to move sprites precisely vertically and horizontally
(unites are measured in pixels).
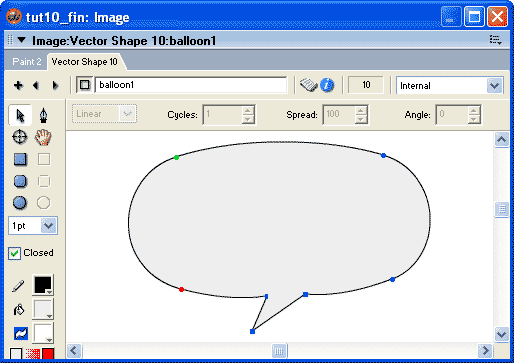
6. Open the Vector Shape window and create a comic text
balloon similar to the one shown below. Create three such balloons, one
to be placed over each person on the Stage. Name the balloons balloon1,
balloon2 and balloon 3
.
7. Open the Text window and create three members one with
the text 'hey there’, the other 'g'day'
and the third 'goodmorning everyone' using Arial 48 and
Arial 36.
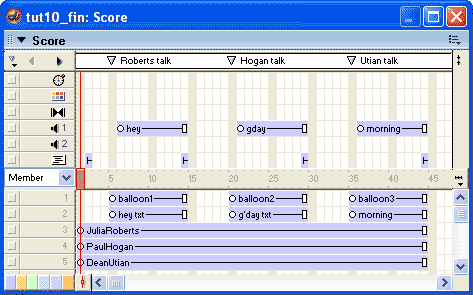
8. Place the hey sound in sound channel
1, extending over frames 6 to 14. Place the gday sound in sound channel
1, extending over frames 21 to 29 and place the morning sound in
sound channel 1, extending over frames 36 to 44.
9. Move the JuliaRoberts, PaulHogan and DeanUtian
sprites down 2 channels so they occupy channels 3, 4 and 5 respectively.
Change the End Points of the sprites to 44.
10. Place balloon1 in channel 1 over frames 5 to
14. Place the balloon2 in channel 1 over frames 20 to 29 and place
the balloon3 in channel 1 over frames 35 to 44.
11. Position each of the vector balloons directly above
each person on the Stage.
12. Place the hey text in channel 2 over the same
frame range as balloon1 and centred over the balloon sprite. Change
the ink effect of the text sprite to Background Transparent.
Do the same for the g’day text (pacing it over balloon2) and
the morning text over balloon3.
Your Score should begin to look like the screenshot below.
When creating navigation, it is important to organise the Score with markers.
13. Place a marker in frame 5 by clicking on the white
bar on the top of your Score (when the sprite toolbar is not visible). An
inverted triangle appears as soon as you click the marker channel together
with the text New marker. Name the marker in frame 5 Roberts talk.
Create a marker in frame 20 called Hogan talk, frame 35 Utian
talk (as shown below).

The next step is to add a pause to give the user time to interact with the
movie.
14. Open the Library Palette, then click on the Library
List button ![]() and select Navigation from the menu.
and select Navigation from the menu.
15. Click and drag the Hold on Current Frame
icon ![]() to frame
2 of the scripting channel.
to frame
2 of the scripting channel.
16. Place the Hold on Current Frame behavior
into frames 14, 29, and 44. This can be done by dragging the behavior from
your cast window (it should now live there) or by copying and pasting the
sprite from one fame to another. Your Score should now look like the screenshot
above.
17. In the Library Palette, click on the Library
List button ![]() and select Animation > Interactive.
and select Animation > Interactive.
18. Click and drag the Rollover Cursor Change icon
![]() onto sprite
3 (JuliaRoberts).
onto sprite
3 (JuliaRoberts).
The parameters dialog box appears.

19.The Finger cursor is the default selection.
Look at the cursors available, then select Finger and press
OK.
You will notice that the behavior now appears as a cast member in the cast window.
20. Attach the Rollover Cursor Change behavior
to sprite 4 and sprite 5 (drag and drop the behavior from teh cast window onto the sprites).
21. In the Library Palette, click on the Library
List button ![]() and select Controls from the menu.
and select Controls from the menu.
21. Click and drag the Jump to Marker Button behavior ![]() onto 3 (JuliaRoberts).
onto 3 (JuliaRoberts).
22. In the Parameters dialog box for the behavior, you will see a drop-down menu next to On mouseUp, jump to marker. Select Roberts talk from the menu, then press OK.
mouseUp represents an event when the left mouse button is released.
As with the Rollover Cursor Change behavior, the Jump to Marker Button behavior appears in your cast window.
23. Drag and drop the the Jump to Marker Button behavior from teh cast window onto sprite 4 (PaulHogan) and linking it to marker Hogan
talk. Repeat the process for sprite 5 (DeanUtian).
24. Rewind and play the movie. Now would be a great time
to save your movie as tut10.
In this tutorial, we created basic interactivity of jumping from one position
in a movie to another by using existing behaviors. The interactivity
is coded in Lingo scripts (behaviors) . In tutorial 12, we will look at the Lingo and learn
how to write scripts.You can see the completed tutorial 10 here - tut10_fin.dir

