Tutorial 5: The Waving Woman - Animating Multiple Images & Alignment
In this tutorial, we will be using an existing file. You will need to
download tut5a.dir
(right click on the file and choose 'Save Target As'). To save time, cast
members have been imported and placed on the Stage.
1. Open movie tut5a.dir.
2. Double click cast member 4 to open it in the Paint window.
You may notice a small cross at the elbow. This is what we will be using
for the pivot point of the arm that will be animated. We will also use this
for the Registration Point, which we will set later.
3. Move the cursor over the selection rectangle ![]() and hold down the mouse button to display the pull-down menu. Make sure
Shrink is selected.
and hold down the mouse button to display the pull-down menu. Make sure
Shrink is selected.
4. Drag a box around the arm to select it.
5. Click the Free Rotate button ![]() at the top of the window. Click one of the anchor points of the rectangle
(at the corners) and rotate the rectangle 90 degrees clockwise.
at the top of the window. Click one of the anchor points of the rectangle
(at the corners) and rotate the rectangle 90 degrees clockwise.
6. We are now going to use Director’s Auto Distort
to generate the sequence of in-between cast members. Auto Distort works
for any of the features in the Paint window's effect toolbar.
Choose Xtras > Auto Distort . A window pops up asking how
many in-between members you would like Director to generate. Type in 5
and click the Begin button.
7. Close the Paint window and open the cast window. Notice
we now have 6 cast members of the arm rotating.
Note: A quicker way to rotate the arm would seem to be
to use the Rotate Right button. However, using
this with Auto Distort will create a set of rotating arms moving in an anticlockwise
direction, which is not what we want.
8. Select the 6 arm cast members - click on the first,
then while holding down Shift, click on the last.
9. Click on frame 2 in channel 2, and choose Modify
> Cast to Time.
 10.
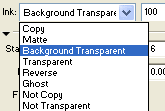
In the Property Inspector, change the ink effect of this sprite to Background
Transparent.
Notice how this makes the white part of the arm transparent. Ink effects
describe transparencies within sprites. Ink effects allow a range of transparencies
of graphic members. Most apply only to bitmap/paint members. The Background
Transparent ink effect makes all white pixels in a bitmap, transparent.
Changing the colour depth of images in Director
11. Select all the arm cast members
in the cast window.
12. Choose Modify > Transform Bitmap.
13. Change the colour depth to 8 bits and
the palette to 3:arm palette.
The arm palette was created outside Director and imported with the original
arm image. The image was changed to 16 bit because Director does not distort
8 bit images very well. In fact, whenever editing an image (even in PhotoShop),
it's best to work with a high colour depth image and only optimise it
once all work on the image is complete.
Setting registration points
When you import images, Director places a registration point at the centre
of the image. This works fine when you are dealing with cast members that
are the same proportions. This is not always the case as with our set
of arms. The solution is to move the registration point to a position
where we can easily identify where the images should be aligned.
14. Double click cast member 4 to display it in the paint
window.
15. Click the Registration Point button![]() .
.
Two intersecting lines appear in the paint window. The point where they
intersect is the registration point. The registration point has been set
to the bottom of the elbow, where a little cross has been drawn. Zoom
into that area to get a closer look.
16. Move through the other arm cast members and click
on the cross at the elbow to move the registration point.
Aligning Sprites
When you place images directly into the Score, Director aligns their registration
point to the centre of the stage. Now we will position sprites in relation
to other sprites on the stage.
1. In the Score we have two sprites in channel 2. In frame
1, we have a sprite of the woman's arm and in frames 2 to 8, we have the
animated arm. Select the animated arm sprite (channel 2, frames 2 to 8).
Press Shift and click frame 1 in the same channel. This selects
both sprites.
 2.
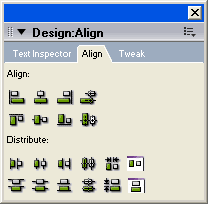
Choose Window > Align.
3. The Align window appears.
![]() Choose
Align horizontal regPoint
Choose
Align horizontal regPoint
![]() and then
Align vertical regPoint. Director aligns all sprites
in relation to the last sprite selected, which in our case was a sprite
already positioned correctly.
and then
Align vertical regPoint. Director aligns all sprites
in relation to the last sprite selected, which in our case was a sprite
already positioned correctly.
Extending the animation and adding a trails effect
1. Delete frame 1 in channel 2, and move the arm sequence
to frame 1.
2. Copy and paste the arm sequence
in channel 2 until the animation continues to frame 30 ( as seen below).
3. Choose Modify > reverse sequence
to reverse the every second sequence.
4. Select all the sprites in channel 2. You can do this
by simply clicking the channel number as shown below.
![]()
5. Click on the Trails button ![]() in the Property Inspector.
in the Property Inspector.
Rewind and play the movie. As you see, the trails button allows the last
sprite position to remain on the stage, providing a ghost type effect.
One last little cleanup task before you can notch up another Director tutorial
to your belt.
6. Expand the Score so you can see the Effects
Channels by clicking on the Hide/Show Effects Channels
button at the right end of your Score window.
![]()
You will notice that there a few sprites in the palette channel. When you
drag an image cast member to the Stage/Score, Director automatically places
its palette in the palette channel.This was a useful feature when dealing
with 8 bit (256 colour) monitors. Today, it is not necessary, so select
all the palette sprites and delete them.
Now would be a great time to save your movie.
You can see the completed Tutorial 5 here tut5a_fin.dir
Animating the Arm without Multiple Cast Members
I have just shown you how to create multiple cast members within Director
to create animation. However, the above process was not the most efficient
way to do it from a disk space point of view. It is better to rotate the
arm sprite using Director's vector animation capability rather than relying
on multiple cast members.
1. Delete all the arm sprites in channel 2.
2. Place the arm cast member (first arm of the sequence we created
before) in channel 2, change the ink to Background Transparent.
Move the sprite so it is placed correctly in relation to the woman.
The movie should now be back to its original state as movie tut5a.dir.
3. In the Score, select sprite 1 (the woman) and sprite 2 (the
arm), then in the Property Inspector, change the end frame from 30
to 9 ![]() .
This changes contacts both sprite to end in frame 9.
.
This changes contacts both sprite to end in frame 9.
4. Click on frame 5 in sprite 2 and choose Insert >
Keyframe.
5. In the Sprite tab of the Property Inspector, change
the Rotation of the keyframe at frame 5 to 90,
and change the Rotation of the end frame of the
sprite to 0.
Rewind and play the movie. We now have virtually the same effect without
using all the extra cast members. Getting Director to rotate the sprite
in the Score makes your computer's CPU to do some extra work. Having changing
cast members is less work for the CPU but the added file space means the
computer needs more RAM. With this example, the arm images are small and
so would not make a significant difference from a RAM point of view. But
if this was a web animation, any file saving means that it would be able
to download quicker across the Internet.
You can see the completed tutorial 5 here tut5b_fin.dir
Adding sound
To make this animation more multimidia-ish, we'll now add some sound and
a touch of interactivity. For this section you will need g_day.wav.
(Right click on the hyperlink and choose 'Save Target As')
1. Open tut5b_fin.dir
(your tutorial as completed to step 5 above).
2. Import g_day.wav.
3. Drag the sound cast to one of the sound channels in
the score and drag its end point to frame 9.
Rewind and play the movie.
Playing the sound file before continuing
4. Double click frame 1 in the tempo channel.
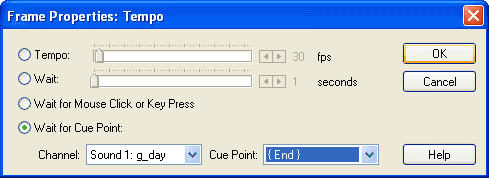
5. In the Frame Properties: Tempo dialog
box (as shown below), select Wait for Cue Point, Sound
1: g_day should be selected in the Channel field
(assuming your sound is in channel 1) . Select End under the
Cue Points drop down, and click OK.

Rewind and play to see (and hear) how the tempo settings work.
Adding simple interaction
1. Change the starting frame of the sound sprite to
frame 2.
2. Double click frame 1 in the tempo channel ![]() .
.
3. Select the Wait for Mouse Click or Key Press
option, and click OK.
4. Rewind and play the movie. Notice on frame 1, a flashing
cursor appears. Click on the screen and see what happens. Play the movie
again and this time press any key and see what happens.

